Google offers storage in the cloud, which you can use to store and serve object data, static host websites, mount as a file system, etc. If you have lots of images on your WP sites and would like to optimize image file delivery, then Google cloud storage may be helpful in many ways.
Reduce bandwidth cost Serve content faster through Google’s low-latency network Reduce storage cost
In the following, I will explain step-by-step how to integrate WordPress with Google cloud storage. Note: You must create an account on the Google Cloud Platform to use their service.
Create a Service Account
First, let’s get a service account created which will be used to connect from WordPress.
Go to Service Accounts under IAM & Admin (direct link) Click create a service account Enter the service account name and description and click Create
It will take you to the next step, where you need to assign a role as Storage Admin. Click Continue
On the next screen, click Create Key. It will prompt another wizard on the right side, where you choose JSON and create
It will take a few seconds and download the JSON file. Keep it in a secure place. Close the service account wizard by clicking DONE.
Create Storage Bucket
Second, It’s time to create the bucket which will be used to store the WP media files
Login to Google cloud and go to storage » browser (direct link) Click Create Bucket
Enter the bucket name (must be unique) Select storage class (let it be multi-regional for better performance) Select a multi-regional location (choose where your users are) Choose set object level bucket permissions and click Create
It will take a few seconds, and you will see the newly created bucket on the list.
Let’s make the bucket object readable by default to all the users so the site visitors can view the media files.
Click on a newly created bucket on the list Go to the permissions tab and click Add members Enter allUsers in members field and select Storage Object Viewer as a role and click Add
Note: be careful in assigning a role to AllUsers. Giving admin or owner permission will cause anyone to take control of it. So ensure, only the viewer role is granted. Well done! The storage bucket is ready to use. Let’s connect with WordPress.
Integrate WP with GCS
There are two easy ways to get this done. First, by using the WP-Stateless plugin (it is FREE). Usability Dynamics develop this plugin. It lets you quickly configure and upload images to GCS bucket whenever you uploaded to WP media library and served directly when requested. The plugin gives you an option to store the files locally on the server as well which I would recommend so in future if you don’t want to use GCS, you can deactivate the plugin and don’t have to copy images back. Sounds good?
Login to WP Admin and install » activate the plugin
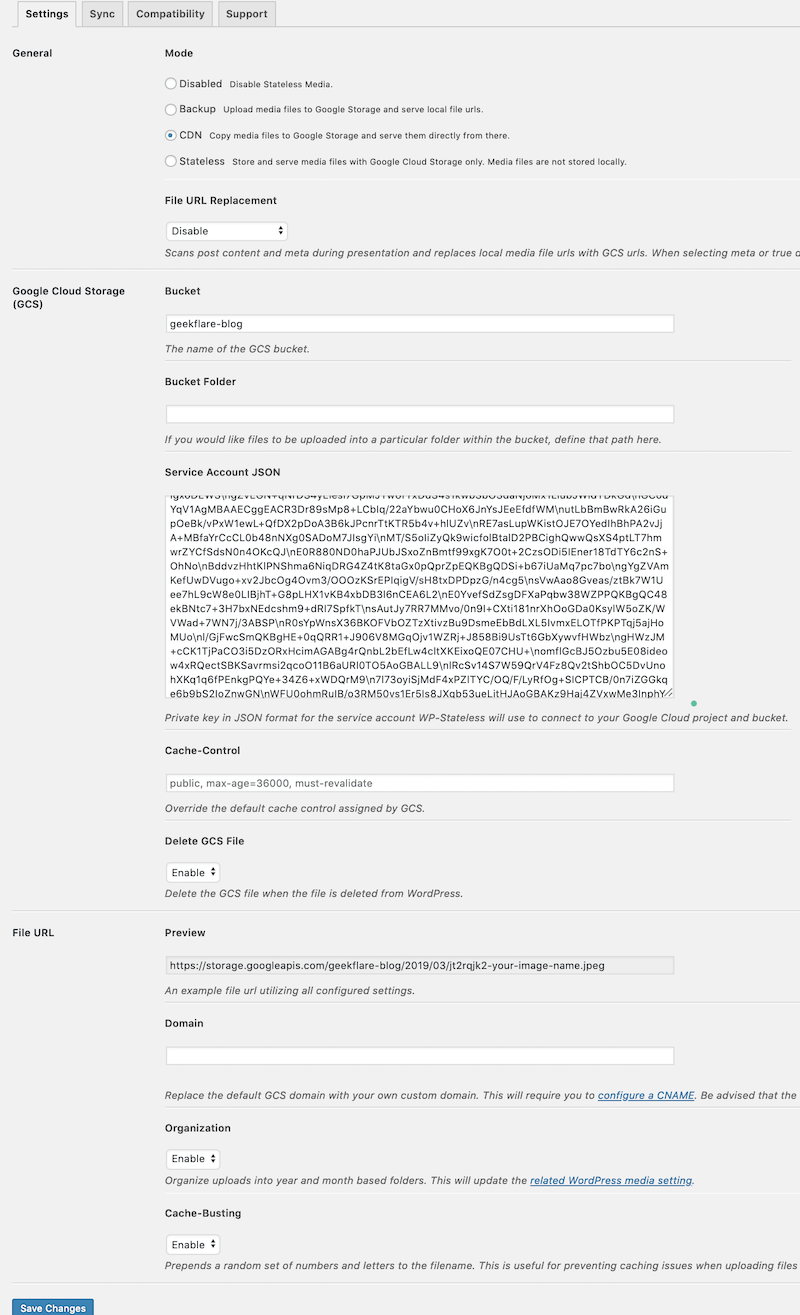
It will take you the wizard, don’t do anything here. Instead, go to the stateless settings under Media
Let’s go through some of the settings to understand the configuration.
Mode – choose CDN, so files are copied to GCS and serve directly from Google Bucket – enter the bucket name which you created Paste the content of the downloaded JSON file into the service account JSON field Enable delete GCS files so when you delete files from your WP; it will be removed from GCS as well Click save changes
Going forward, whenever you upload new media files, it will be uploaded to the GCS bucket and will be served directly from there. Let’s quickly verify it. I uploaded one png file manually through Media Library and as you can see below the URL address is from Google storage. If you would like to upload existing images to GCS, then you got to go Sync tab and run. Sync may take some time but once done; you should be able to see all images are getting loaded from Google cloud storage. Second, you can use a premium plugin called WP Offload Media.
Conclusion
I hope this guide helps you to offload WP media files to Google Cloud and for better performance improvement. For caching and other benefits, you may also consider WP Rocket.

![]()


